Battery switch on travel trailer function is crucial for managing your RV’s power. Understanding how these switches work – whether single, dual, or rotary – is key to preventing battery drain and ensuring you have power when you need it. This guide will walk you through the different types, installation, troubleshooting, and maintenance, empowering you to keep your travel trailer’s electrical system running smoothly.
We’ll cover everything from selecting the right switch for your needs (considering amperage, number of batteries, and compatibility with other systems like solar panels and inverters) to diagnosing common problems and performing basic maintenance. Properly understanding your battery switch is vital for a safe and enjoyable RVing experience.
Understanding Battery Switches in Travel Trailers
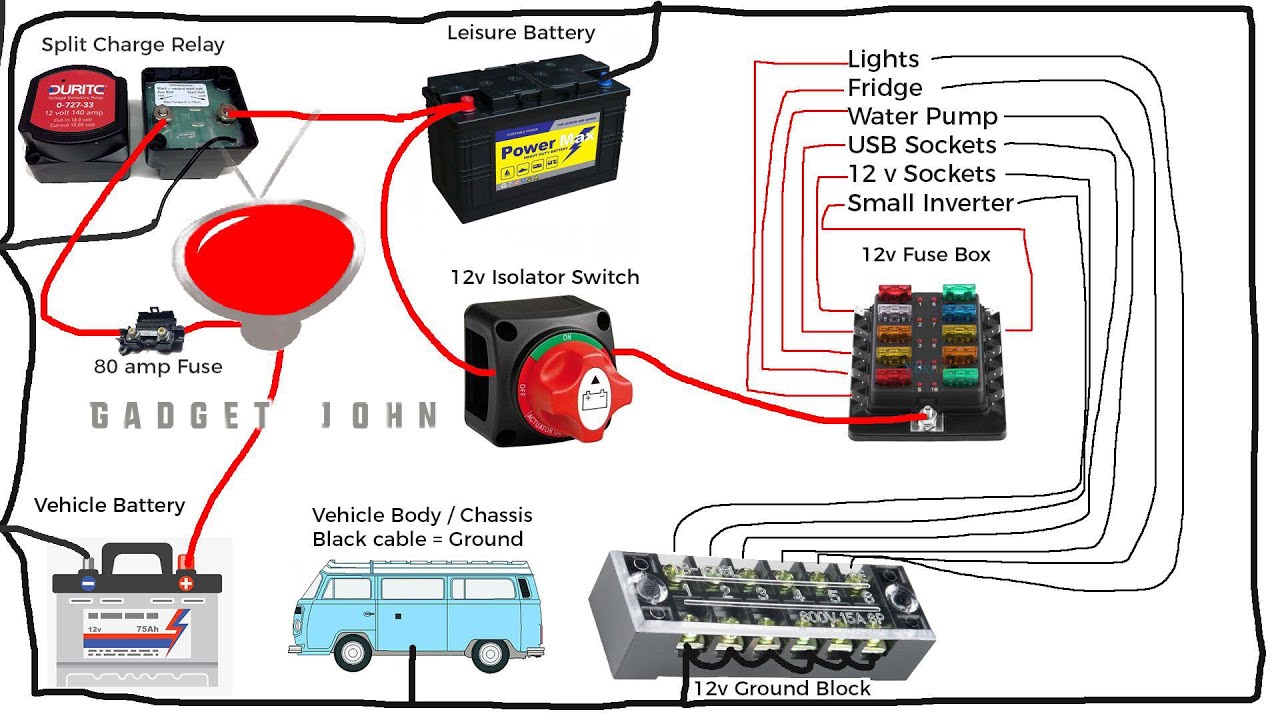
Properly managing your travel trailer’s power is crucial for a smooth and enjoyable camping experience. A battery switch is a key component in this system, allowing you to control the flow of power between your house batteries and the various electrical systems in your RV. Understanding how these switches work and how to install them is essential for any RV owner.Battery switches act as the gatekeepers for your trailer’s 12-volt DC power.
They prevent unwanted battery drain when your trailer is not in use and allow you to isolate different battery banks for maintenance or charging. This prevents potentially damaging situations such as accidentally draining your starting battery while using your house appliances.
Types of Battery Switches
Travel trailers commonly utilize several types of battery switches. The most prevalent are simple on/off switches, which provide a basic method for connecting or disconnecting the batteries. More advanced systems incorporate selector switches, allowing you to choose between different battery banks (like a starting battery and house batteries) or to completely isolate the batteries from the trailer’s electrical system.
Some higher-end RVs use more complex electronic switches that offer additional features such as remote control and low-voltage cutoff protection.
Typical Wiring Configurations
A typical battery switch setup involves connecting the positive (+) cables from your batteries to the switch’s input terminals. The output terminal of the switch then connects to the positive bus bar, which distributes power to the various loads (lights, water pump, etc.) in your trailer. The negative (-) cables are typically connected directly to the chassis or ground bus bar, bypassing the switch for safety and simplicity.
This configuration ensures that only the positive side of the circuit is controlled by the switch. An improperly wired negative side could create dangerous situations.
Installing a Battery Switch
Installing a battery switch is a relatively straightforward process, but it requires some basic electrical knowledge and careful attention to safety. Always disconnect the battery’s negative terminal before starting any work.
- Choose a location: Select a readily accessible location, typically near your batteries, but protected from the elements.
- Mount the switch: Securely mount the switch to a stable surface using appropriate hardware.
- Connect the positive cables: Connect the positive cables from each battery to the input terminals of the switch, ensuring proper cable sizing and secure connections.
- Connect the output cable: Connect the output cable from the switch to the positive bus bar. Again, ensure secure and correctly sized connections.
- Connect the negative cables: Connect the negative cables directly to the chassis ground or negative bus bar.
- Test the system: After installation, carefully test the system to ensure proper functionality. Turn the switch on and off, verifying that power flows correctly to the various loads.
Remember to consult your RV’s wiring diagram and follow all safety precautions during installation. If you are unsure about any aspect of the process, it is always best to seek professional assistance.
Diagram of Power Flow
Imagine a simple diagram. Two batteries (Battery 1 and Battery 2) are shown with positive (+) and negative (-) terminals. Their positive terminals are connected to the input terminals of a double-pole, double-throw (DPDT) switch. The switch’s output terminal connects to a positive bus bar. From the bus bar, multiple wires branch out to various loads in the RV (e.g., lights, water pump).
The negative terminals of both batteries are connected directly to the chassis ground. The switch acts as a gate, allowing or preventing the flow of current from the batteries to the loads. When the switch is in the “off” position, the circuit is broken, and no power flows to the loads. When the switch is in the “on” position, the circuit is complete, and power flows to the loads.
The diagram clearly shows the one-way control of power flow, emphasizing the safety of the negative connection being directly grounded.
Battery Switch Function and Operation
A battery switch is the central control for managing power flow in your travel trailer’s electrical system, especially when you have multiple batteries (like a house battery and a starting battery). It’s essentially a sophisticated on/off switch, but with more options to precisely manage power distribution and protect your batteries.The primary function of a battery switch is to isolate and direct power from different batteries to different circuits within your RV.
So, you’re planning a trip? Awesome! Don’t forget travel insurance! For comprehensive coverage, check out aon travel insurance ; they’ve got you covered for pretty much anything. But if you’re looking for something specifically tailored for business trips, aon travel insurance offers plans designed for executives. Compare both options to find the best fit for your adventure!
This prevents accidental draining of one battery by another and allows you to selectively charge and use your batteries. For example, you can choose to power your lights and appliances from your house battery while keeping your starting battery fully charged for engine cranking.
Battery Switch Roles in Preventing Battery Drain
A battery switch is crucial for preventing what’s often called “parasitic drain.” This happens when a small but constant current drains your batteries even when your RV is off. This could be due to things like a faulty light, a perpetually-on device, or a failing appliance. By switching off your house battery when you’re not using your RV, you prevent this slow, insidious drain that can leave you with a dead battery when you need it most.
A well-maintained and correctly used battery switch significantly reduces the risk of this type of battery failure.
Comparison of Battery Switch Types
Several types of battery switches exist, each with its own advantages and disadvantages. Single battery switches are the simplest, offering only an on and off position for a single battery. Dual battery switches allow you to isolate or combine two batteries, giving you more control. Rotary switches are more complex and typically offer multiple positions, including “both,” “off,” and individual battery selections.
Rotary switches often provide more granular control, particularly useful in systems with multiple batteries or sophisticated power needs.
Troubleshooting a Malfunctioning Battery Switch
If your battery switch isn’t working correctly, several simple troubleshooting steps can often pinpoint the problem. First, visually inspect the switch for any obvious damage, loose connections, or corrosion. Clean any corroded terminals with a wire brush and baking soda solution. Next, check the wiring connections to ensure they’re secure and undamaged. If you’re still having issues, test the switch itself using a multimeter to check for continuity in the different positions.
If the switch itself seems faulty, it’s best to replace it with a new one of the same or upgraded type, ensuring compatibility with your RV’s electrical system. Remember to always disconnect the negative terminal of your batteries before performing any electrical work to prevent shocks or short circuits.
Selecting the Right Battery Switch
Choosing the correct battery switch for your travel trailer is crucial for safe and reliable power management. A poorly chosen switch can lead to overheating, damage to your batteries, or even electrical fires. This section will guide you through the key factors to consider when making your selection.
Factors to Consider When Choosing a Battery Switch
Several factors influence the choice of a suitable battery switch. These include the amperage rating, the number of batteries you need to manage, the type of batteries (flooded lead-acid, AGM, lithium), and the overall convenience and features offered. Consider your trailer’s power demands and future expansion plans to ensure the switch can handle the load. Don’t underestimate your current and future needs!
Battery Switch Comparison Table
The following table compares common features of different battery switches. Remember that specific models within each brand may have variations.
| Feature | Low-Amperage Switch (e.g., 75A) | Medium-Amperage Switch (e.g., 150A) | High-Amperage Switch (e.g., 300A) |
|---|---|---|---|
| Amperage Rating | 75 Amps | 150 Amps | 300 Amps |
| Number of Batteries Supported | Typically 2 | Typically 2-4 | Typically 4 or more |
| Typical Applications | Smaller travel trailers with lower power demands | Mid-sized travel trailers with moderate power demands | Larger travel trailers with high power demands, multiple appliances |
| Price Range | Generally lower | Moderate | Generally higher |
Reputable Brands and Models
Several reputable brands manufacture high-quality battery switches for travel trailers. Note that specific model availability and features can change, so always check the manufacturer’s website for the most up-to-date information. Examples include Blue Sea Systems, Perko, and AGS. Specific models within these brands vary greatly in amperage and features. For example, Blue Sea Systems offers a wide range, from their smaller 75 amp switches to their larger 300 amp units.
Always cross-reference the manufacturer’s specifications with your trailer’s power needs.
Implications of Insufficient Amperage Rating
Selecting a battery switch with an insufficient amperage rating is dangerous. The switch will overheat, potentially causing melting, fire, and damage to your electrical system and batteries. For example, if your trailer requires 200 amps and you install a 75-amp switch, the switch will be constantly overloaded, leading to premature failure and potentially serious consequences. Always choose a switch with an amperage rating significantly higher than your expected peak current draw to ensure sufficient safety margin.
It’s better to slightly overestimate your needs than underestimate them.
Maintenance and Safety Precautions
Keeping your travel trailer’s battery switch in top condition is crucial for reliable power and preventing potentially dangerous situations. Regular maintenance and adherence to safety procedures are key to ensuring a long lifespan and trouble-free operation. Neglecting these aspects can lead to costly repairs, power failures, and even safety hazards.Regular maintenance extends the life of your battery switch and prevents unexpected problems on the road.
Proper safety procedures are essential to avoid electrical shocks and other injuries when working with your RV’s electrical system. Understanding the potential risks of incorrect installation or use is vital to safe and reliable operation.
Battery Switch Maintenance Schedule
A simple maintenance schedule can significantly improve the lifespan and reliability of your battery switch. This involves visual inspections and occasional cleaning to prevent corrosion and ensure proper functionality.
- Monthly Inspection: Visually inspect the switch for any signs of corrosion, loose connections, or damage to the casing. Check the terminals for any buildup of white powder or green corrosion. Tighten any loose connections gently.
- Semi-Annual Cleaning: Use a wire brush or a battery terminal cleaner to remove any corrosion buildup from the terminals and the switch itself. Apply a dielectric grease to the terminals after cleaning to prevent future corrosion.
- Annual Thorough Check: Once a year, conduct a more thorough inspection, including checking the wiring connections for any signs of damage or wear. If you’re not comfortable doing this yourself, consult a qualified RV technician.
Safety Procedures for Working with Battery Switches and Wiring
Working with electrical systems requires caution. Always prioritize safety to avoid potential hazards like electric shocks, burns, or fires.
- Disconnect the Batteries: Before working on the battery switch or any related wiring, always disconnect the negative (-) terminal from the battery. This prevents accidental short circuits and protects you from electric shocks.
- Use Insulated Tools: Use insulated screwdrivers and other tools to prevent accidental contact with live wires. Never work on electrical components while wearing wet clothing or if your hands are wet.
- Wear Safety Glasses: Protect your eyes from potential sparks or flying debris by wearing safety glasses. This is a crucial safety precaution for any electrical work.
- Proper Ventilation: Batteries release gases. Ensure adequate ventilation while working near batteries to avoid inhaling potentially harmful fumes.
- Consult a Professional: If you are uncomfortable working with electrical systems, it’s best to consult a qualified RV technician. They have the expertise and experience to handle electrical work safely and correctly.
Preventing Corrosion and Extending Battery Switch Lifespan
Corrosion is a common enemy of battery switches and connections. Taking preventative measures can significantly extend the life of your switch and maintain its performance.
- Use Dielectric Grease: Apply a thin layer of dielectric grease to the battery terminals and switch terminals after cleaning. This creates a barrier that prevents moisture and corrosion from forming.
- Keep the Area Clean and Dry: Regularly clean the battery compartment and the area around the battery switch to prevent the accumulation of dirt, dust, and moisture. This helps to minimize corrosion.
- Proper Ventilation: Ensure good ventilation around the batteries to prevent the buildup of moisture and corrosive gases.
- Use Corrosion Inhibitors: Some specialized corrosion inhibitors are available that can be applied to battery terminals and connections to provide extra protection.
Risks of Incorrect Installation or Use of a Battery Switch
Incorrect installation or use of a battery switch can lead to various problems, ranging from minor inconveniences to serious safety hazards.
- Electrical Fires: Loose connections or incorrectly wired switches can create sparks and heat, potentially leading to fires.
- Battery Damage: Incorrect wiring can lead to overcharging or discharging of batteries, shortening their lifespan or even damaging them permanently. For example, connecting the positive and negative cables directly without a switch could cause a short circuit and immediate battery damage.
- Electrical Shocks: Improperly installed switches can expose live wires, increasing the risk of electric shocks.
- System Malfunction: Incorrectly configured switches can cause unexpected power outages or failures in your RV’s electrical system.
Troubleshooting Common Issues: Battery Switch On Travel Trailer Function
Dealing with a faulty battery switch in your travel trailer can be frustrating, but systematic troubleshooting can usually pinpoint the problem quickly. Common symptoms include a complete lack of power to your trailer’s systems or intermittent power failures, sometimes related to specific appliances or circuits. Let’s explore how to diagnose and resolve these issues.
Troubleshooting Flowchart for a Non-Functioning Battery Switch
A visual guide can significantly streamline the troubleshooting process. The following flowchart Artikels a logical approach to identifying the source of the problem when your battery switch isn’t working correctly.
Start –> Check Battery Switch Position (Is it correctly set to the desired position (e.g., “Both,” “Battery,” “Shore Power”)?) –> YES: Proceed to Check Battery Voltage (Use a multimeter to check the voltage at the battery terminals and at the output of the switch. Is the voltage present and correct?); NO: Proceed to Check Switch Connections (Inspect all wiring connections to the switch for tightness, corrosion, or damage.
Are all connections secure and free of corrosion?) –> YES: Proceed to Check Fuses and Breakers (Inspect fuses and circuit breakers both at the battery and in the trailer’s distribution panel. Are any blown or tripped?); NO: Proceed to Replace Battery Switch (If all other checks are clear, the switch itself may be faulty.) –> END.
Planning a trip? Don’t forget travel insurance! For comprehensive coverage, check out aon travel insurance – they’ve got you covered for pretty much anything. And if you’re traveling for business, aon travel insurance offers specialized plans for executives, ensuring peace of mind during your business trips. Seriously, getting travel insurance is a no-brainer; it’s cheap peace of mind.
So, browse their options and get insured!
Testing the Battery Switch with a Multimeter
A multimeter is an invaluable tool for diagnosing electrical problems. To test your battery switch, follow these steps:
- Set the Multimeter: Set your multimeter to measure DC voltage.
- Connect to the Battery: Connect the multimeter’s positive (red) lead to the positive terminal of your battery and the negative (black) lead to the negative terminal. Note the voltage reading; this is your battery’s voltage.
- Connect to the Switch Output: With the switch in the “Both” or “Battery” position, connect the multimeter’s leads to the switch’s output terminals. Compare this reading to the battery voltage. A significant drop or no voltage indicates a problem with the switch or its connections.
- Test Different Positions: Repeat the process with the switch in different positions (e.g., “Shore Power”) to ensure proper switching functionality.
Potential Causes of Battery Switch Failure and Solutions, Battery switch on travel trailer function
Several factors can contribute to a malfunctioning battery switch. Addressing these systematically increases your chances of a quick fix.
- Loose or Corroded Connections: Inspect all wiring connections to the switch for looseness or corrosion. Clean any corroded terminals with a wire brush and reconnect securely.
- Blown Fuse or Tripped Breaker: Check fuses and circuit breakers associated with the battery switch. Replace any blown fuses with the correct amperage rating and reset any tripped breakers.
- Faulty Battery Switch: If all connections and protection devices are working correctly, the switch itself might be defective. Replacement is the likely solution.
- Internal Switch Failure: Sometimes, the internal components of the switch fail. This usually requires replacing the entire switch unit.
- Wiring Issues: Check for broken, damaged, or improperly connected wiring between the battery, switch, and distribution panel. Repair or replace any faulty wiring.
Integrating Battery Switches with Other Systems

A battery switch is the heart of your travel trailer’s electrical system, but its effectiveness depends heavily on how it interacts with other components like solar panels, inverters, and various power sources. Proper integration ensures efficient power management and prevents potential problems. Understanding these interactions is crucial for reliable off-grid living.Integrating a battery switch with other systems requires careful planning and consideration of your specific setup.
This section will cover how to effectively connect and manage your power sources for optimal performance.
Solar Panel Integration
Solar panels are a common addition to travel trailers, providing a sustainable power source. Connecting solar panels to your system involves routing the output of the solar charge controller directly to your batteries. The battery switch then controls the flow of power from the batteries to the rest of your trailer’s appliances. This arrangement allows you to utilize solar energy to charge your batteries, and then draw power from those batteries through the switch as needed.
It’s important to ensure your solar charge controller is compatible with your battery type. A mismatched system can lead to overcharging or damage.
Inverter Integration
Inverters convert DC power from your batteries to AC power for running household appliances. The placement of the inverter in the circuit is key. Typically, the inverter is placed downstream of the battery switch. This means the inverter only draws power from the batteries when the battery switch is in the “on” position for the batteries. This provides a convenient way to turn off the AC power to all your appliances simultaneously.
Some more advanced systems might have a dedicated circuit breaker for the inverter, providing additional safety and control.
Power Source Prioritization
Many RVs use multiple power sources—shore power, generator, and batteries. A properly configured battery switch allows you to prioritize these sources. Typically, shore power takes precedence. When shore power is available, it directly powers the trailer, and the batteries are charged. If shore power is lost, the system automatically switches to the generator, and then finally, to the batteries as the last resort.
This prioritization sequence can be achieved through the use of automatic transfer switches or by carefully arranging your wiring and circuit breakers. This setup maximizes the use of available power sources and extends battery life.
Impact of Different Battery Types
The type of battery you use (lead-acid, lithium, etc.) significantly impacts battery switch selection and operation. Lead-acid batteries require specific charging profiles to avoid damage, and some battery switches might not be compatible with lithium batteries, which have different voltage and charging characteristics. Lithium batteries often require more sophisticated charge controllers and battery management systems (BMS) that may interact differently with a battery switch compared to lead-acid systems.
Therefore, always consult the manufacturer’s specifications for both your battery switch and your batteries to ensure compatibility. For instance, a switch designed for lead-acid might not have the voltage protection features needed for lithium.
Example of Integration in a Complex System
Consider a system with shore power, a generator, solar panels, a lithium battery bank, and an inverter. Shore power would connect directly to the charging system for the lithium batteries (via a BMS), bypassing the battery switch. The generator would similarly connect to the charging system. Solar panels would feed into a solar charge controller that then connects to the lithium battery bank.
The battery switch would control the power flow from the lithium batteries to the rest of the trailer’s DC appliances. The inverter would draw power from the batteries through the battery switch to provide AC power to household appliances. A circuit breaker panel would protect individual circuits, ensuring safety. This configuration ensures efficient power management, prioritizes external power sources, and protects the lithium batteries.
Mastering your travel trailer’s battery switch is a fundamental skill for any RVer. By understanding its function, proper installation, and basic maintenance, you’ll prevent costly repairs, ensure reliable power, and extend the lifespan of your batteries. Remember, safety is paramount when working with electrical systems – if you’re unsure about anything, consult a qualified electrician. Happy travels!
FAQ Corner
What size battery switch do I need?
The required amperage rating depends on your battery bank’s capacity and the appliances you’ll be running. Consult a qualified electrician or the switch manufacturer for guidance.
How often should I clean my battery switch?
Inspect your battery switch monthly for corrosion and clean it with a wire brush and baking soda solution as needed. More frequent cleaning might be necessary in humid climates.
My battery switch is making a clicking sound. What’s wrong?
A clicking sound often indicates a loose connection or a faulty switch. Check all wiring connections and consider replacing the switch if the problem persists.
Can I use a battery switch with lithium batteries?
Yes, but you’ll need a switch specifically designed for lithium batteries, as they have different voltage and charging characteristics compared to lead-acid batteries.
